Showing posts with label Fairy Fun Fridays. Show all posts

Friday, March 30, 2012

Spring Fling MW Reminder at Fairy Fun Fridays

Golfer Lewis is the focal point of my card for Fairy Fun Fridays midweek reminder Spring Fling.  I think the beret through me off and I was thinking of the Dr. Kinsley image, because I made Lewis look like a doctor that was golfing before his rounds.  Needless to say the accents are circles, I ran the white ones through the Big Shot with the Swiss Dots embossing folder to give the circles a golf ball divot look.  On the inside of my card, I stamped the greeting first and ran it through the same embossing folder.  Check out Prairie Fairy Designs and find the perfect image for you to work with, heck who can stop at one!  Enter the Fairy Fun Fridays challenge and get a chance at some freebies!


Challenges I am entering:

Stampin' Royalty - spring things
Party Time Tuesdays - anything goes
Shopping our Stash - circles or dots
Stamp'n'Doodle - embossing
Cards for Men - the great outdoors
Digi Makeover Challenge - for the boys
Kaboodle Doodles - circles and squares
Karen's Doodles - make it for a man

Friday, March 23, 2012

Spring Fling at Fairy Fun Fridays

This week at Fairy Fun Fridays the challenge is Spring Fling, so we hope you catch the bug in wanting a warm, snow free spring and make a card to go with that theme.  I used Purrfect Friends from Prairie Fairy Designs as I loved being on swings in the spring and feeling the cool breeze in my face.  I hope you join us this week in the challenge, it's the only way to have a chance at winning some fabulous freebies!


Challenges I am entering:

Crafts and Me - spring colors
Little Darlings Challenge - spring is in the air
My Mum's Craft Shop - use a digi
Scrapbook Sisters - anything goes
Stars and Stamps Midweek Throwdown - yellow and green
Whimsy Inspiration - anything goes
Celebrate the Occasion - welcome spring
Crazy Amigo Challenge - spring
Going Grey with Scrap-Creations - flowers
My Time to Craft - doilies and flowers
Sassy Cheryl's - think spring

Friday, February 10, 2012

Let Me Call You Sweetheart at FFF

Cherbub Gilly from the Valentine's Gilly Set makes a beautiful centerpiece to this card.  Prairie Fairy Designs has created a variety of beautifully designed images available for you to purchase.  The design team brings you wonderful creations every week to inspire you to create your own projects.  Enter this week's challenge at Fairy Fun Fridays for your opportunity to win some Prairie Fairy images to enhance or build your digital collection.


Challenges entered:

Our Creative Corner - love is in the air
Di's Digis Designs - Valentine's
Crafty Calendar - love and marriage
The Crafty Pad - Fresh Spring Colors
Stampin' Sisters in Christ - create a card/project that shows love
Kenny K Krafty Girlz - say it with love
Gingerloft - love is in the air
Crafting When We Can - Valentines/love
Catered Crop - hearts
Bunny Zoe's Crafts - photo inspiration
Victorine Originals - love/Valentines
Stamps R Us - Valentines/love
Stamp and Create - Valentines/love
Ooh La La Creations - be my Valentine
My Craft Spot - Valentines
Lollipop Crafts - Valentines Day card
iCopic Challenge - (must use copics) hearts
Daisy Doodles Creative Challenge - (must use a digi) - Valentines Day
Crafty Boots - Valentines
Tuesday Throwdown - be my Valentine
The Stamping Boutique - Valentines week
Shopping Our Stash - hearts, valentines and/or lace
Sassy Cheryl's - be my Valentine
Partytime Tuesday - Valentines
Everybody Art Challenge - love
Digital Tuesday - (must use a digi) pink or red
Crafty Sentiments - let's get girly
Clear It Out - use old supplies - Valentines/love twist use your pink/red scraps
Truly Scrumptious - love and hearts
Ruby's Rainbow - sparkle
Penny's Paper Crafty - love is in the air
Little Red Wagon - cupid's arrow

Sunday, February 5, 2012

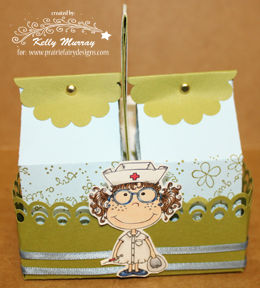
Milk Carton Tote Tutorial Plus a Few More Totes

This little milk carton tote was a work in progress, I wasn't sure how it was going to turn out.  I thought I would provide you with a little tutorial in case you wanted to copy it.


1. This is the die cut I used to make the milk cartons, I got it from Stampin' Up.  The papers needed to cut each milk carton out measure 5.75 x 7.5".  You will need two, one for each carton.  Place the paper on the top of the die cut and using your clear acrylic cutting pads run it through your Big Shot or other die cutting machine.


2.  Before folding on the score lines use a stamp wheel of your choice and ink it up, I used Basic Black ink and the Very Vintage jumbo wheel.  Roll the wheel over the center of the red cardstock, this will be the bulk of your carton that is showing.  Repeat on the other carton, remember you are making two.


3.  Fold on each of the score lines for both milk cartons.


4.  Add adhesive to the inside of three of the bottom panels of the milk carton.  Lining them up carefully, put the flap without adhesive in the center first and then one at a time adhere the other flaps to the make the bottom of the carton.


5. Apply adhesive to the side of the carton prior to gluing the bottom flaps together, it is easier to add now rather then when your box bottom is assembled.


6.  Peel off adhesive backing and adhere the sides of the cartons together.


7.  Work with the top of the carton until you get these folds to move comfortably without buckling any of the sides.


8.  Cut two pieces of coordinating cardstock (I used black) measuring 2.75 x 2.75".  Score 1/2" in on each side.  Cut the corner flaps in on direction.  Repeat this step on the opposite side of the square.  Apply adhesive to the four corners.  Fold the cardstock on the score lines.  (Sorry for the black and white pics, changed the settings and didn't realize I hadn't changed them back until it was too late! :)  )


9.  Put the flaps on the inside of the box and peel of the backing to adhere into a box bottom.  Repeat for the second box bottom.


10. Cut a strip of black cardstock measuring 1.75 x 8.5" long, score it at 4.25".  Cut a piece of patterned paper measuring 1.5 x 8" long, score at 4".  Fold your patterned paper in half and on the scored edge using a 3/4" punch (for finger handle) push it about 1/2-3/4" down from the score line.  Make sure it is centered from the edges and punch out.  When you open it up it will have a hole on both sides of the score line.  Lining up your score lines with both the patterned paper and the black cardstock, use a pencil and trace the hole onto the cardstock on one side only.  Remove the patterned paper, fold the cardstock and punch out where the circle is traced.  The reason for doing this is to line up your holes and the punch has difficulty going through 4 layers of paper.  Starting at the center, put adhesive onto the back of the patterned paper and adhere to the black cardstock.  Once that is secure adhere the rest of the patterned paper to the black cardstock.


11. Take a small adhesive and place it on the back along the bottom of both sides of the handle.  Add it to the back of each box.  

12. Place adhesive to the rest of the handle so it will stick to itself.  In the below pic this is done and both the cartons are placed inside the boxes.  (Whew, caught onto the b&w setting on the camera and switched it back to color!)


13. Cut a strip of cardstock measuring 1.75 x 12".  Punch out with a border punch of your choice, I used a Martha Stewart punch here, so don't remember the name.  After it is all punched out, trim the width down to 1 3/8".  Adhere to the carton tote starting in the middle of the long side, line it up with the handle.  I used Sookwang 1/2" tape (great stickability) and applied it directly to the tote about 1/4" up from the bottom.  Then carefully wrap the punched border around the tote one side at a time.

Here's a pic of it without the cartons in it.

14.  Punch out 2 scallop circles (mine measure 1.75" across) from black cardstock, score down the middle of each.  I used Gold Smooch Pearlized Accent Ink to detail the edges of the scallops.


15.  Fold the scallop in half on the score line, punch a 1/8" hole out of it.  Then line it up over the carton, draw the circle with a pencil to line up the holes.  Remove the scallop and punch a hole through the top of the carton with a 1/8" hole punch.


16. Insert a brad in each carton through the scallop.


17. Adhere your colored image to the front of your carton.  I used Geisha Gillian from Prairie Fairy Designs.


18. I used Crystal Effects and covered the edge of the punched border with a glittery gold ribbon.  I overlapped the ribbon at the same spot my bordered edge over laps.  I then added red Glitter Candy Dots to the big holes on the border punch.


19.  I added the Smooth Accent Ink to the edges of the border punch. And you have a finished box.


I have made a couple of other boxes with different colors, images, borders, accents.


These boxes have the images Nurse Gillian, Dr. Kinsley and Leah, all from Prairie Fairy Designs.

Friday, February 3, 2012

Anything But a Card MW Post at FFF

Hi again, just popping in with a little something that I hope inspires you to make your own project and enter it into our Fairy Fun Fridays challenge this time around.  The challenge is Anything But a Card and the team has really outdone themselves.

I made a candy, or tea bag or condiment holder, use it in whichever way you would choose.  The Prairie Fairy Designs image I used is called Geisha Gillian and definitely was a challenge to color as it isn't even 2 1/2" tall!  I will post a tutorial in a day or two to show you how I created this simple little gift box.


Challenges I am entering:

Come and Get It Challenges - anything but a card
One Stitch at a Time - use a digi
The Hybrid Chick Card Caravan - punches/dies
Little Claire's - anything but a card
Crafty Bloggers Network - oriental
Heart Song Inspirations - buttons and/or brads
Lollipop Crafts - anything goes
My Craft Spot - anything goes
Crafty Sentiments - punches and/or dies
Digital Tuesday - red, black and white
Inky Impressions - pearls or bling
Delightful Challenges - punches and dies
Rainbow Lady's - show someone wearing red

Friday, January 27, 2012

Altered Acetate Box for FFF challenge

This little box was a labor of love as our third daughter graduates the end of March from high school (homeschooled) and will soon be determining when to move on with the next phase of her life.  We are very proud of her and this is one way I thought of to let her know how much.  I will be posting a tutorial later today showing how I made this box as I took the instructions from Splitcoast Stampers and altered them for what I needed, plus I turned the top into a mortarboard to complete the look.

I used Graduate Gilly from Prairie Fairy Designs for my image and for the challenge of Anything but a Card at Fairy Fun Fridays.  Go check out what the design team has whipped up for this challenge and don't forget to enter your own work at a chance to win some gorgeous Prairie Fairy images.


Challenges entered:
Cardmadfairy's Digi Days - must use a digi, ribbons and bows
Stamp Man - embellish it
Simon Says Stamp - anything goes
Digital Tuesday - a new beginning
My Time to Craft - my favorite embellishment (ribbon)
Tuesday Throwdown - so charming
Critter Sketch -create a project using 3 embellishments (brad, ribbon, owl charm)
Incy Wincy Designs - anything but a card
Lexi's Creations - fancy folds
Make It Monday - anything goes
Scrappers Delight - anything goes
Crafty Emma - anything but a card
Little Claire's - anything but a card


Friday, January 13, 2012

California Dreamin' at FFF

This week at Fairy Fun Fridays the theme is California Dreamin' (the song lyric) hosted by our lovely fairy princess Hannah.  I used the Fairy Sleepy from Prairie Fairy Designs.  This is the first time I did a graduated dot background around any of my images and kind of like it!  Don't miss out on your opportunity to get some FREE Prairie Fairy Design images by entering your creation.  Make sure you drop by the princesses and give them some love for their inspirations!


Challenges entered:

2 Sisters - things with wings
Catch the Bug - anything goes
Crafty Emma - anything goes
Lexi's Creations - anything goes
House of Gilli - anything goes
Heart Song Inspirations - border punches/turn paper
Magical Mondays - anything magical goes
Craft Your Passion - mythical creatures
Southern Girls - sparkle
Flutterby Wednesdays - (must include butterfly, fairy or angel) bright colors

Friday, January 6, 2012

Midweek Challenge at Fairy Fun Fridays

Well I hope everyone had a good Christmas with family and friends and is ready to embrace the New Year.  If today is part of it we got 3 inches of snow and although it isn't super cold, it does make for interesting driving.  I colored this image Sugar Plum Fairies before Christmas and tried it on at least 4 projects before I settled with this card.  The challenge this fortnight is Sparkly Wings, so make sure you enter your creation at Fairy Fun Fridays for your chance to win some awesome Praire Fairy Design images.

Friday, December 16, 2011

Angel Tree Topper

This week at Fairy Fun Fridays the challenge is to make something for Christmas without using the traditional colors of red or green.  I chose to use the image Sitting Pretty from Prairie Fairy Designs, colored her with Copic Markers and used Dazzling Diamonds glitter on the wings.  I cut out around her arms and added her to a cone shaped paper that I had stamped and heat embossed.  Before adding my image I added lace and ribbon at the bottom of the skirt.  Once the Sitting Pretty image was on the skirt, I added a bow to the back of the dress and flowers and pearl strands to the front to complete it.  Now who wouldn't want to have this on the top of their tree?

Don't forget to check out all of the design team's work.  And don't miss out on your chance to win some beautiful Prairie Fairy Design images, go enter today!


Challenges I am entering:


Friday, December 2, 2011

Paper Lantern Prairie Fairy Style

Mistletoe Kisses and Gilly's Carolling are the two images from Prairie Fairy Designs that I used on this paper lantern for the challenge at Fairy Fun Fridays this week.  Join us this week as the challenge is 'Beat the Winter Blues' inspired by a picture our Fairy Princess Corry came up with.  Your creation must have blue, if you are picked you can win FREE goodies from Prairie Fairy Designs for you to make your own wonderful works of art!  I was inspired to make this paper lantern from Norma, check out her website to find out how to make your own lantern.

I changed the measurement on the box at the bottom of the lid to make it simpler to fit in the lantern by reducing each side on the fold by 1/8".  I crimped the shingles on the roof and added Liquid Pearls and Stickles to give the appearance of snow and ice.  Hope you like it!


Challenges I am entering:

Craft Your Passion - anything holiday or winter related
Paper Sundaes - Winter Wonderland
Hooked on Craft Challenge - Winter Wonderland
Simon Says Stamp - anything goes
Cooking It Up with Katie - anything goes
Fab'n'Funky - anything goes

Friday, November 18, 2011

Fall Frolicking

I love this card, so whimsical, remembering days gone by!  I used Swingin Summer from the Prairie Fairy Designs collection to make this tent card.  The leaves were punched out from a border punch and I sponged the edges to give them more definition.  I coordinated the colors of the pearls around the opening with the colors of the card.  The theme this week at Fairy Fun Fridays is Fall and hosted by Kendra, don't miss out on your opportunity to win some great images from Prairie Fairy Designs, enter today!


Challenges I am entering:

Drunken Stampers - up in the air
2 Sisters Challenge - anything goes

Friday, November 11, 2011

No Black Lines Continued

In keeping with the No Black Lines challenge at Fairy Fun Fridays, I created another card using the Tree Fairy image made by Prairie Fairy Designs.  I also worked on really showing off the pleats in her gown.  Don't miss out on your change to enter this challenge, cut off is Wednesday.  I used Smooch Accent Ink to outline each of the matted pieces, glitter pearls, poinsettias and a few swirls cut out of glitter paper from Spellbinders die cuts.


Challenges I am entering:

Dream Valley Challenge - anything goes
I Did It Creations - Christmas or Winter
HeartSong Inspirations - anything goes
Paper Creations Ink - holiday wishes for kids
Crazy Challenges - something with wings
Totally Stampalicious - anything goes
Stamp n Doodle - sparkle and shine
Digital Tuesday (must use a digi) - anything goes
Crazy Amigos - swirls
Top Tip Tuesday - Christmas
Ruby's Rainbow - something with wings
Stampavie and More - anything goes
Emerald Fairies - red Christmas
Catch the Bug Challenge - anything goes

Friday, November 4, 2011

Sweet Baby Girl

This week the challenge at Fairy Fun Fridays is "No Black Lines".  You may ask what do you mean "No Black Lines", simply that, you must either stamp your image with a pale colored ink or washout the digital image as described on the Fairy Fun Fridays site.  For this card I used 'Spring Ducks' I know a peculiar choice for this time of year but it worked for this baby girl card that I made.  I used lace to frame the card, the sentiment is a die cut, some mauve floral roses and a triple bow.  Still trying to master the Bow Easy.  You can enter this challenge and have the opportunity to win fantastic images from Prairie Fairy Designs just by trying this technique.  Don't miss checking out the rest of the DT's great works of art either!


Challenges I am entering:

Dream Valley Challenges - anything goes
Scrappy Frogs - something that flies
Pollycraft - anything goes
Lollipop Crafts - anything goes
Digital Tuesday - (must use a digi) cute and cuddly
Stampavie and More - anything goes
Freshly Brewed Designs - anything goes

Friday, October 21, 2011

Harley Boy

This week at Fairy Fun Fridays the challenge is Wet Embossing, in my card for the DT I created tire treads to go with my Harley Boy image from Prairie Fairy Designs.  I punched out small rectangles that resembled tire treads out of a scrap piece of cardstock, then laid it over my DP and inked the empty spaces with Versamark.  Removing my mask I then added black EP and heated it up to give this effect.  
Don't miss out on your opportunity to win some FREE images from Prairie Fairy Designs, just enter the challenge!  Check out the DT's cards, they are all truly talented ladies!


Challenges I am entering:

Fetch a Sketch - sketch
KB Cute Monday - anything goes
Lollipop Crafts - no sentiments allowed
Whoopsi Daisy - anything goes
Lothian Crafts Online - anything goes

Friday, October 7, 2011

Sugar and Spice

This week at Fairy Fun Fridays the theme is Sugar and Spice, so anything girly.  I have merged the two images called Villa Road and Gilly's Bike created by the Fairy Queen at Prairie Fairy Designs.  I used the technique shown here to create this scene.  I started coloring this image wanting an Italian countryside, but after coloring the building it took more of a Mexican feel with the adobe.


Close up


Challenges I am entering:

Cutie Sunday - no text or sentiment
Clean & Simple Sunday - anything goes as long as it is clean and simple
One Stitch at a Time - use a digi
Craft Your Passion - anything goes with ribbon (I hope lace counts?)
Whoopsie Daisy - lace and pearls
Ribbon Carousel - (must have ribbon, twin,e jute, lace) - anything goes
Anything Goes - die cuts/punches
Try It On Tuesdays - clean and simple
Penny's Challenges - anything goes
Crafts and Me - use a digi