


This little milk carton tote was a work in progress, I wasn't sure how it was going to turn out. I thought I would provide you with a little tutorial in case you wanted to copy it.

1. This is the die cut I used to make the milk cartons, I got it from Stampin' Up. The papers needed to cut each milk carton out measure 5.75 x 7.5". You will need two, one for each carton. Place the paper on the top of the die cut and using your clear acrylic cutting pads run it through your Big Shot or other die cutting machine.


2. Before folding on the score lines use a stamp wheel of your choice and ink it up, I used Basic Black ink and the Very Vintage jumbo wheel. Roll the wheel over the center of the red cardstock, this will be the bulk of your carton that is showing. Repeat on the other carton, remember you are making two.

3. Fold on each of the score lines for both milk cartons.

4. Add adhesive to the inside of three of the bottom panels of the milk carton. Lining them up carefully, put the flap without adhesive in the center first and then one at a time adhere the other flaps to the make the bottom of the carton.

5. Apply adhesive to the side of the carton prior to gluing the bottom flaps together, it is easier to add now rather then when your box bottom is assembled.

6. Peel off adhesive backing and adhere the sides of the cartons together.

7. Work with the top of the carton until you get these folds to move comfortably without buckling any of the sides.


9. Put the flaps on the inside of the box and peel of the backing to adhere into a box bottom. Repeat for the second box bottom.


11. Take a small adhesive and place it on the back along the bottom of both sides of the handle. Add it to the back of each box.

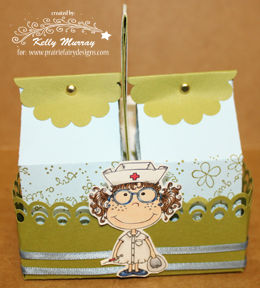
12. Place adhesive to the rest of the handle so it will stick to itself. In the below pic this is done and both the cartons are placed inside the boxes. (Whew, caught onto the b&w setting on the camera and switched it back to color!)


Here's a pic of it without the cartons in it.

14. Punch out 2 scallop circles (mine measure 1.75" across) from black cardstock, score down the middle of each. I used Gold Smooch Pearlized Accent Ink to detail the edges of the scallops.


15. Fold the scallop in half on the score line, punch a 1/8" hole out of it. Then line it up over the carton, draw the circle with a pencil to line up the holes. Remove the scallop and punch a hole through the top of the carton with a 1/8" hole punch.

16. Insert a brad in each carton through the scallop.


18. I used Crystal Effects and covered the edge of the punched border with a glittery gold ribbon. I overlapped the ribbon at the same spot my bordered edge over laps. I then added red Glitter Candy Dots to the big holes on the border punch.


.jpg)


No comments:
Post a Comment